Disclosure: As an Amazon Associate I earn from qualifying purchases.
Beekeeping teaches you one simple truth: nature doesn’t wait for anyone. Seasons shift, temperatures drop, and the rhythm inside the hive changes in ways you can’t always predict. Winter isn’t just cold, it’s a test. And that’s where winter bee hive wraps come in. They’re not just insulation; they’re strategy. The difference between bees barely surviving and bees thriving when spring rolls around. Adapt, protect, and wrap smart because the hive, like everything else in nature, rewards those who prepare for change.
Beekeeping has this beautiful rhythm to it. Through the seasons, you start to see how fragile and yet incredibly resilient your bees are. But winter? That’s the real test. The frost creeps in, the flowers vanish, and the hive becomes a world unto itself, alive, buzzing, and holding its breath until spring. This is where winter bee hive wraps step in like a warm coat for your buzzing friends. They’re not just about comfort; they’re about survival. And trust me, once you understand how these wraps work, you’ll never see cold-weather beekeeping the same way again.
Understanding the Purpose of Winter Bee Hive Wraps
Every beekeeper who’s gone through a harsh winter knows one thing: temperature control inside the hive is everything. Winter bee hive wraps are designed to give bees a stable environment when the cold outside becomes unbearable. They work by trapping heat generated from the bees’ own movement, keeping it circulating inside the hive instead of escaping into the icy air. Think of it as a layer of beehive insulation that acts like a buffer between your colony and the winter chill.
What’s clever is how these wraps do more than just retain warmth. They help reduce condensation buildup, one of the biggest dangers to bee colony survival during freezing months. When warm air from the cluster meets cold hive walls, moisture forms and can drip onto the bees, chilling them to death. With the right beehive winter protection, you minimize that risk dramatically. That’s why seasoned beekeepers swear by insulated hive wraps.
At its heart, the purpose of a winter wrap isn’t to heat the hive; it’s to help bees regulate their own microclimate. They’ve evolved to do this naturally, but wraps give them a better chance when temperatures plunge. It’s a small intervention that makes a huge difference for overwintering bees.
How Cold Weather Affects Honeybee Colonies
When temperatures dip below 50°F, honeybees form a tight cluster around their queen, shivering to generate heat. This is how they survive. However, if the temperature drops too quickly or stays too low for too long, even the strongest colony can suffer. Bee hive temperature management becomes a balancing act between warmth and ventilation.
Cold snaps can also reduce bees’ access to stored honey, since the cluster can’t move far without losing heat. Many colonies starve just inches away from full honey frames. That’s why proper winter beekeeping preparation, including wrapping, feeding, and monitoring, is essential. A well-insulated hive keeps internal temperatures more stable, allowing bees to move safely and access food reserves.
On top of that, prolonged cold can increase moisture levels inside the hive. The combination of freezing air and condensation is deadly, which makes hive moisture control one of the most critical elements of beekeeping tips for winter. The goal is to help the bees conserve energy, stay dry, and maintain their cluster temperature without stress.
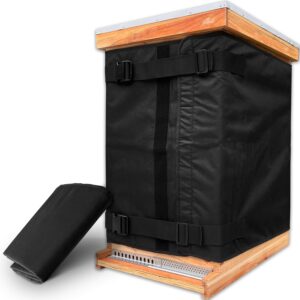
Types of Materials Used for Winter Bee Hive Wraps
There’s no one-size-fits-all material when it comes to winter bee hive wraps. Beekeepers use everything from commercial insulated beehive jackets to simple DIY solutions made from tar paper, foam board, or reflective bubble insulation. Each has its strengths and weaknesses depending on your region’s climate and the severity of your winters.
Tar paper, for example, is a traditional favorite. It’s affordable, helps absorb sunlight, and provides a moderate wind barrier. Foam wraps, on the other hand, offer higher thermal protection and are ideal for areas where temperatures consistently drop below freezing. Some beekeepers even experiment with thermal hive wraps made from recycled materials, layering them for better insulation.
Commercially manufactured insulated hive wraps are becoming popular because they’re lightweight, weather-resistant, and easy to install. Many include built-in moisture vents or reflective surfaces that help regulate temperature fluctuations. Choosing the right material depends on how much insulation your bees truly need and how severe your local winters tend to be.
View more Winter Bee Hives on Amazon
Choosing the Right Insulation for Your Climate
Not every hive needs the same level of protection. If you live in a mild climate, heavy insulation might trap too much heat and moisture, doing more harm than good. On the other hand, in areas where temperatures regularly plunge below freezing, your bees need serious backup. Understanding your apiary winter setup is the first step toward choosing the right insulation.
For regions with dry, cold winters, lightweight insulated beehive jackets often work best. They keep drafts out but allow airflow. In damp, snowy areas, a combination of outer insulation and moisture-absorbing materials inside the hive can make a huge difference. Beekeepers often add moisture boards or quilt boxes above the frames to help absorb condensation and prevent drips.
I like to think of it as tailoring a winter coat for your bees. You wouldn’t wear the same jacket in Alaska as you would in North Carolina, right? The same logic applies here. Matching insulation type to climate keeps your colony comfortable without overheating or suffocating.
How to Properly Install Winter Bee Hive Wraps
Installing winter bee hive wraps correctly can make or break their effectiveness. The process starts with cleaning and inspecting your hive. Any cracks or gaps should be sealed, as drafts will undo all your hard work. Once that’s done, wrap the hive tightly but not so snug that it restricts ventilation. Remember, bees need airflow to manage humidity and carbon dioxide levels.
Start by placing your wrap around the brood box, securing it with tape, staples, or straps. Leave a small gap or vent hole near the top entrance so moisture can escape. If you’re using insulated hive wraps with a reflective surface, position the shiny side outward to deflect wind and sunlight efficiently. Some beekeepers add a top cover or beehive cover for an extra layer of weatherproofing.
One smart move is to check that your hive entrances remain clear. Snow, ice, or debris can easily block the bees’ exit. Keeping that airflow consistent is part of good bee hive maintenance during winter. Done right, the wrap becomes a second skin for your hive, keeping warmth in and harsh weather out.
Balancing Ventilation and Insulation in Winter Hives
A common mistake among beginners is over-insulating their hives, thinking more warmth equals better survival. In reality, bees can handle cold; it’s dampness that kills. The real trick is balancing insulation with proper ventilation. Without enough airflow, moisture builds up, freezes, and then rains back down onto the bees. That’s a recipe for disaster.
Most experienced beekeepers create a small upper entrance or vent hole to release humid air while the wrap keeps wind and drafts at bay. Some even use screened bottom boards to allow excess moisture to escape. It’s like designing a cozy cabin with a warm inside, but breathable.
This balance is what separates solid winter beekeeping from lucky outcomes. When you manage both insulation and airflow, you create an ideal microclimate where bees can regulate their hive naturally, reducing energy loss and improving bee colony survival rates.
Preventing Moisture Build-Up Inside the Hive
Moisture is the silent killer of winter hives. Even with perfect insulation, condensation can sneak in when warm bee-generated air meets cold hive walls. That’s why effective hive moisture control is so important. A damp hive becomes moldy, heavy, and lethally cold for your bees.
The best method to combat moisture is to give it a place to go. Adding moisture boards, absorbent quilt boxes, or newspaper layers above the inner cover helps soak up excess humidity. Some beekeepers also tilt their hives slightly forward so condensation drains out instead of pooling inside. It’s small tricks like these that make a huge difference.
In combination with winter bee hive wraps, these moisture management techniques help maintain a dry, comfortable environment. Bees can survive extreme cold if they’re dry and have food, but wet, cold bees rarely make it past January. Keep things dry, and your hive will thank you when spring arrives.
DIY vs Commercial Winter Bee Hive Wrap Options
There’s a certain charm in crafting your own wraps, especially if you’re a hands-on kind of beekeeper. DIY hive wrapping techniques can be cost-effective and customizable. Materials like foam board, roofing felt, and reflective insulation are easy to find at most hardware stores. The key is making sure your homemade wrap is breathable and weather-resistant.
That being said, commercial insulated hive wraps have come a long way. They’re engineered for durability, often reusable, and designed with optimal insulation thickness. Some even feature adjustable straps, built-in vents, and UV-resistant layers. For beekeepers managing multiple colonies, they save a lot of time and hassle.
Whether you choose DIY or commercial wraps depends on your budget, skill level, and number of hives. Both options work well if done correctly. Personally, I like to mix approaches using commercial wraps for my main production hives and testing DIY designs on smaller colonies. Keeps things fun and experimental.
Common Mistakes to Avoid When Wrapping Bee Hives
It’s easy to get excited about winter prep and overdo it. One of the biggest mistakes I’ve seen is wrapping too tightly, which blocks ventilation and traps moisture. Remember, the goal of winter bee hive wraps isn’t to seal the hive like a vacuum; it’s to create a stable, breathable environment.
Another mistake is neglecting the top vent or forgetting to check the hive mid-winter. Even the best wrap can shift, tear, or collect ice. Make it a habit to inspect your hives after major storms. Also, never wrap a weak colony expecting insulation to fix its poor health or low population need to be addressed before winter even starts.
Lastly, avoid using materials that trap condensation, like plastic sheeting without ventilation holes. It might look waterproof, but it’ll suffocate your bees in no time. Smart beehive winter protection means thinking ahead, not just covering up.
Monitoring and Maintaining Wrapped Hives Throughout Winter
Once the wraps are on, the job’s not over. Regular checks are crucial to make sure everything stays in place. Keep an eye on snow buildup around entrances, ice accumulation, or signs of shifting from the wind. Lightly tapping the hive can tell you a lot if you hear a steady buzz; your colony’s active and healthy.
Monitoring also helps you catch early signs of trouble like dampness, mold, or rodent damage. Quick fixes like tightening straps, clearing vents, or brushing off snow can prevent serious losses. Your winter routine becomes less about intervention and more about observation.
Come late winter, as temperatures start to rise, start loosening the wraps gradually. You don’t want to shock the bees with sudden exposure. Think of winter bee hive wraps as seasonal armor essential when it’s freezing, but meant to come off when the world starts blooming again. Protecting your bees through winter isn’t complicated once you understand their needs. Give them insulation, airflow, and a bit of attention, and they’ll reward you with strong, thriving colonies when spring returns.
Final Word
In the rhythm of beekeeping, winter is both a challenge and a lesson. It teaches patience, observation, and trust in the tiny creatures we care for. With the right winter bee hive wraps, smart moisture control, and balanced insulation, you’re not just helping your bees survive, you’re setting them up to thrive.
Disclosure: Amazon and the Amazon logo are trademarks of Amazon.com, Inc, or its affiliates.